Posted by Amy Pak on
With all the subjects that a child has to study in school, have you noticed how hard it is for that child to retain the information once the study is done?
Unless children are continuously building upon what they’ve learned, the information can drift away pretty quickly when they have to fill their brains with new and different material. The general response to this has been assigning lengthy writing projects, such as reports and essays, which most children cringe at doing over and over.
However, I have a solution that provides a much better result — not to mention, a happier child! What is it? A lapbook!
What is it?
You may be asking, “What is a lapbook?”
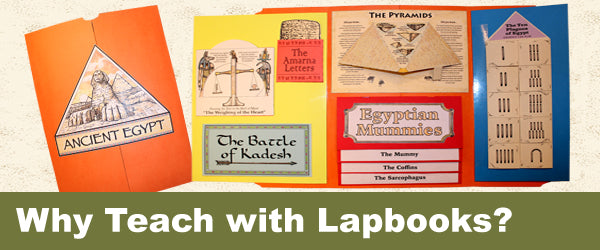
A lapbook is a file folder, folded in a way that it creates a “portfolio” of sorts.

Each lapbook pertains to a topic and is filled with a myriad of small projects that refer to that topic. Not only are there various shapes to the projects, but many can have multi-folds, pop-ups, sliders, pockets, you name it! If it can fold flat, anything is up for grabs!
All assembled within the folder and attached to pages within it, lapbook projects allow creativity in writing styles, opportunities for illustration, charts and graphs, and games to be added in …the ideas are endless. Projects can be done using multi-colored papers and adorned with glitter or yarn or items that can be glued in place. The more creative, the better it will be remembered.
For example, let’s look at some lapbook ideas using the topic of Plymouth Colony Pilgrims from the Colonial Era of American history. Within the lapbook, you may have a two-flap project that compares and contrasts “Saints” and “Separatists.” Another project may show a diagram of the levels of the Mayflower ship. Another project could be a map showing the route of the Mayflower and the locations of Plymouth and Jamestown in the New World. A penmanship project could be included of “The Mayflower Compact.”
Another project could focus on the Wampanoag natives, and another might be a pocket with cards of various people of importance we read about in Pilgrim history, both within the colony and natives that helped and taught the Pilgrims. Finally, another project could open to show the Thanksgiving feast the Pilgrims shared with the natives. It could include call-outs of the foods provided or even a few basic recipes
Each project would be its own entity, adhered within the lapbook. As you can see, each project would show various aspects of the Pilgrims and their journey and settlement.
Why Use It?
Lapbooks are an amazing way to gently teach a child how to really hone in on the important information — how to do without the fluff and just keep to the facts and the crux of the material!
The beauty of these small projects is that they do not contain endless amounts of text, but a concentrated small paragraph, using call-outs such as on a diagram or map or using bullet points that pertain to the topic. Not only is this less daunting to a child to write, but it is also easier to remember key facts. Not to mention, learning to pare down information to a small nugget is a skill in itself! It not only makes it less to write but easier to remember!

By also including illustrations or images that children can draw or glue in, these images provide a connection that further solidifies the knowledge into their brain. Allowing them the freedom to color or add embellishments to the projects expands their creativity.
Hands-on learning generally makes for more engaging lessons with children!
I liken a lapbook to an “amusement park in a portfolio,” as once you open the cover, all kinds of colorful and unique projects await you! Once the lapbook is complete, it also makes for a piece that the child will be pleased to show to others. Don’t be surprised if you see the child pull it out periodically to look and continue to play with it long after the study is done (and further remind him of what he had learned about!). It’s compact and easy to store, while often becoming a keepsake in the future!
How to Get One… or Make One!
You may be wondering where to begin on how to make a lapbook.
There are a few basic materials you need to get started:
- A file folder
- A few pieces of colored card stock
- Clear packing tape
By refolding the file folder to meet in the middle, you can adhere the card stock within the folder to create flap pages to hold your projects.

At this point, you are ready to create a cover and the projects to place within it! There are many companies with printable or premade lapbooks for sale (such as ours at Home School in the Woods), or you can follow simple lapbook basics to make your own.
Premade lapbooks provide ease of use. Our goal has been to provide options for creative writing or highlights for some of the projects, as well as text provided for others and options to draw images to go with them. Many projects are interactive to make them more fun to play with!
You may want to look at images online or the photos on our Activity-Paks and Lap-Paks for lapbook examples. However, you may be a “do-it-yourselfer,” and a simple search for lapbook templates online will provide several options for a variety of folds, pockets, and flap books.
When it comes to creating the inner projects themselves, there are several books available that contain templates, such as the "Dinah Zike’s books on Foldables," or ones on how to make cards with pop-ups and sliders. Pinterest also has many pins for free templates. Once you know the basics for making unique foldables and interactive projects, you can assign them to whatever topic that’s appropriate to its use!
For example, if you have a science lapbook on insects, you may want to use a 3-panel foldable for illustrating the three parts of an insect’s body. If you are doing a lapbook on volcanoes, you may want to use a slider to show the lava erupting from a volcano and a layered book for the levels of the earth’s crust. Once you’ve gathered all your projects, you’ll assemble them into the lapbook using either a glue stick or double-sided sticky tape.
Here is a great video for setting up the lapbook itself:
All of our Time Travelers and Project Passports contain a lapbook as well! Here is another video from a family that made the lapbook from our Colonial Life history study:
Now that you’ve seen a couple of lapbooks in action…
Why not try one with your studies! It’s a great way to break away from the mundane world of workbooks and lengthy written papers, while providing a wonderful source to engage a child’s creativity.
Note: If you like the idea of hands-on learning, you may want to consider teaching with timelines as well!
If you like what you see, please share this post! And don’t forget to comment below — we’d love to hear your thoughts!
I love hands on activities, they really help with kinesthetic learners.