Posted by The Home School in the Woods Team on
October is National Pizza Month! As if we needed another reason to eat more pizza! With 31 days on the calendar, we have plenty of time to explore all things pizza – from its history to its many mouthwatering flavors.
So, who invented pizza, and what’s National Pizza Month all about anyway? Keep reading to find out. Plus, get our family’s favorite go-to pizza recipe that will leave you thanking us from the bottom of your stomachs!
When Is National Pizza Month?
We hope you like carbs, because when people Google “October is national what month,” they get National Pizza Month, National Pasta Day, and Italian-American Heritage Month! Lucky for you, we’re just focusing on pizza.
National Pizza Month began in 1984 when a small-town pizzeria owner named Gerry Durnell felt inspired to better market his business and the pizza industry as a whole by creating a special month for it. He published a pizza-themed magazine called Pizza Today and declared October (the same month he opened his beloved business) as National Pizza Month.
Today, people all across the globe celebrate National Pizza Month. Many pizzerias give away free slices or donate a portion of their proceeds to charities. Some even offer spin-off pizzas they wouldn’t normally make year-round, such as rattlesnake meat pizza!
The History of Pizza
Did you know that every second, an average of 350 pizza slices are sold? That’s a lot of pizza! It might leave you wondering how it became one of the world’s most popular foods.
Many foods we enjoy today have evolved over time – one of them being pizza. The word “pizza” first appeared in Latin text around 997 AD with ancient Egyptians, Romans, and Greeks consuming a pizza-like food involving flatbread with various toppings (similar to focaccia).
As time went on, this food was found by other cultures and perfected into the food we know and love today. However, according to History, we do, in fact, have the Italians to thank for steering this delicious food in the right direction.
The birthplace of pizza is widely believed to have taken place in the city of Naples. Founded in 600 B.C., Naples was a Greek settlement known for its waterfront traffic and abundance of working-class people.
Flatbread with toppings like oil, garlic, herbs, cheese, tomatoes, and anchovies was a “poor man’s food” sold on the streets for anyone looking to fill their stomachs without breaking the bank.
Although this sounds like a satisfying meal to many of us, Italian authors of this time referred to the eating habits of these men as “disgusting.” Pizza continued to be a repulsive food found on the streets of Naples for quite some time until royal visitors stumbled upon it and loved it.
In 1889, Italian King Umberto I and Queen Margherita visited Naples and sought out a food that was unfamiliar to their taste buds. They requested a variety of “pizzas” from Naples’ Pizzeria Brandi.
The chef made a pizza topped with mozzarella cheese, red tomatoes, and green basil (the colors of the Italian flag). The story goes that the queen loved it so much, they named it Margherita pizza after the queen herself.
Despite the queen’s recommendation, pizza continued to be a relatively unknown food specific to the city of Naples. It wasn’t until the 1940s, when Neapolitan immigrants shared their pizza recipe with New Yorkers, that it would hit the ground running.
Pizza joints were showing up in popular cities like Boston, Chicago, St. Louis, New Haven, and Trenton. These ethnic “pies” swept the U.S. after WWII and quickly became “fast food” everyone and anyone could enjoy.
After the war, Italy and many other countries hopped on the bandwagon, furthermore expanding its many fan-favorite flavors.
Combining Food and History
Here at Home School School in the Woods, we’re all about combining history and fun projects – especially projects that involve food! Chances are your child’s favorite food, along with its ingredients, show up somewhere in history. So, why not do a study on it?
Adding interest to history with recipes is easy. Plus, it gives you an opportunity to “double-dip” with other important subjects like math, science, and home economics. Throughout our years of homeschooling, making recipes with our children was one of our favorites.
Not only did it give us a chance to bond as a family and learn important cooking skills, but it lent for some unforgettable memories like breaking out the dress-up clothes and inviting the family over for a little history presentation.
Pizza Month is the perfect time to start adding recipes into your history curriculum. Start by spending some time looking into the history of pizza and the many varieties that exist. Let your children pick a recipe that sounds yummy to them or allow them to throw together their own crazy concoction!
Make Our Family’s Favorite Pizza!
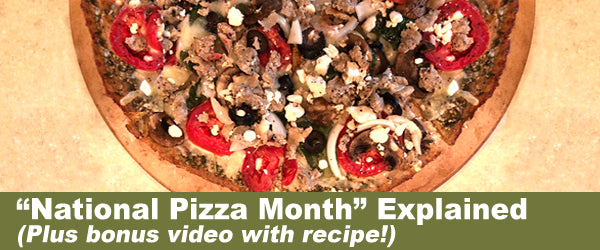
If you’re looking for an amazing healthy pizza recipe, then look out! The Pak household LOVES pizza. It’s a staple food in our house since it's a guaranteed crowd-pleaser that can easily be altered as gluten-free, vegan, vegetarian, etc.
Since pizza isn’t necessarily considered a “healthy” dinner option, my daughter-in-law and I decided to make a wholesome pizza without missing out on the delicious taste of pizza. Combined with my gluten-free cauliflower-oat crust and her “all-the-things-free” secret olive oil garlic sauce, we managed to make a guilt-free pizza everyone in the family craves.
Below are step-by-step instructions (and a video!) showing you how to make our family’s favorite pizza. Although we enjoy topping ours with tomatoes, spinach, mushrooms, and onions, feel free to make it your own, especially since September 20th is National Pepperoni Pizza Day and October 11th is National Sausage Pizza Day!
Cauliflower-Oat Pizza Crust Ingredients:
- 2 c. cauliflower (riced — see directions below)
- 1 c. shredded mozzarella
- 2 c. quick or rolled oats
- 2 tsp. onion powder
- 2 tsp. salt
- 2 tsp. garlic granules/powder
- 3 tsp. dried herbs (basil, oregano, Italian seasoning)
- 4 eggs (large)
- cooking spray or olive oil
- unbleached parchment paper
Cauliflower-Oat Pizza Crust Directions:
- Prep the cauliflower by ricing it in a food processor while raw. Throw into a microwave-safe bowl with 4 tbs. water and cover with a microwavable plate. Cook on high for about 6 minutes or until tender. Drain and transfer to a clean dishcloth or layers of cheesecloth. Squeeze out as much moisture as you can—you want it as dry as possible. You may want to spread it out on a baking sheet and roast it for a little while in the oven to dry it out. This will help make the crust firmer to hold the toppings.
- Set oven to 400°.
- Spray two pizza stones or baking sheets and line with parchment paper. Spray the parchment paper as well with cooking spray.
- In a food processor, blend the oats until it creates a coarse flour. Add in the cheese, salt, eggs, onion powder, garlic powder, herbs, and cauliflower. Process until it is evenly incorporated and creates a thick dough. It will be a little bit wet.
- Place one half on a pizza stone/pan. You can either try to spread the dough with your hands (lightly wet your hands with water first), or place a piece of parchment paper on top and roll out to an even thickness, approximately ¼” thick. Gently pull back the top parchment paper and neaten up the edges with your fingers. Do the same with the second half of the dough on the second stone/pan.
- Bake for 12 minutes. Take crusts out of the oven and carefully flip the crust and parchment over. Gently peel off the parchment that had been on the bottom. Bake for another 12 minutes.
- Remove the crusts from the oven and top as desired. Continue to bake until the cheese is melted, approximately 8 minutes. Once finished, allow to sit for 5 minutes before cutting and serving.
Garlic Olive Oil Pizza Sauce Ingredients:
- ¼ c. olive oil
- 2 tbsp. minced garlic
- 1 tbsp. parsley
- 1 tsp. garlic powder
- 1 tsp. onion powder
- Dash of salt and pepper
Garlic Olive Oil Pizza Sauce Directions:
- Mix all of the ingredients together in a bowl. Once the crust is baked, brush onto the pizza with a silicone pastry brush, and then add your favorite toppings.
Watch our video for visual step-by-step instructions!
We hope you enjoyed our National Pizza Month ideas and that you try our family’s favorite pizza recipe! Don’t forget to tag us in your pizza pics and use the hashtag #NationalPizzaMonth!